Composter Assembly Instructions:
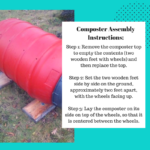
Step 1: Remove the composter top to empty the contents (two wooden feet with wheels) and then replace the top.
Step 2: Set the two wooden feet side by side on the ground, approximately two feet apart, with the wheels facing up.
Step 3: Lay the composter on its side on top of the wheels, so that it is centered between the wheels.
Composter Operation:
Place the composter where it will have good exposure to the sun.
Adding material to the composter:
Depending on the volume of material inside the composter, it may be possible to add material while the composter is laying on the wheels. Remove the lid, add chopped up food waste or lawn cuttings and then replace the lid. If the composter is nearing capacity, stand it up on the bottom with the lid facing up, remove the lid, add materials, replace the lid and set the composter back on the wheels. Save a few bags of leaves to add handfuls to the composter throughout the year.
Mixing the contents:
Heat, moisture and oxygen are important components in the composting process. A series of holes have been drilled into the sides of the rolling composter to allow air inside and water to escape. From time to time, spin the composter on the wheels to mix the contents and to accelerate the composting process. If the contents are very dry, it can be helpful to add water. Stationary composters will require a shovel or pitch fork to mix the materials.
Emptying the composter:
Compost should appear dark and crumble when disturbed. Remove the lid and use a trowel or shovel to reach into the interior of the composter to remove the contents. Take care not to damage the plastic. When the composter is light enough; it can be turned upside down to empty the remaining contents. The material can be screened to remove large and incomplete decomposing materials which can be added back into the composter.
Winter operation:
The composting process slows down greatly in cold weather, however with sufficient heat from the sun and protection from winter winds, it is possible to continue to advance the process so that compost is available at the beginning of the growing season.
Composter Maintenance:
Wood will begin to decay over time, especially when in contact with damp earth. Consider placing thecomposter feet on patio stones, bricks, or other pieces of wood. This will help elevate the composterfeet and keep them a distance from the moist ground. Consider applying a wood sealant to the wooden feet at the beginning of each season. Apply vegetable oil to the wheels at the beginning and end of each season and whenever they appear to need lubrication to keep them free rolling. Proper maintenance will keep your rolling composter operating properly for many years.
Composter Warranty:
A two year product repair or replacement warranty is offered under normal use. Proof of purchase is required.


